


Top 10 Steps to Mastering Double Unders: A Beginner’s Blueprint
Top 10 Steps to Mastering Double Unders: A Beginner’s Blueprint
If you’ve ever picked up a jump rope with the goal of learning double unders, you know it’s not as easy as it looks. The timing, coordination, and technique required to get the rope under your feet twice with a single jump can be frustrating — especially when your shins are taking a beating and you’re stuck in that awkward space of “almost got it.”
The good news? Double unders are a learned skill. With the right progression and some patience, you can go from zero to stringing together clean sets. Below is a 10-step guide built to take you from frustrated beginner to double under master — one jump at a time.
While double unders aren’t part of HYROX competitions, they are a staple in CrossFit events and offer valuable benefits that extend well beyond the competitive floor. Training double unders helps improve coordination, timing, rhythm, and lower-body explosiveness—skills that translate to nearly every form of functional fitness. Even if you’re not preparing for a CrossFit WOD, incorporating double unders into your training can enhance your footwork, cardiovascular endurance, and neuromuscular control, making them a worthwhile addition to any well-rounded fitness routine.
1. Build a Solid Single Under Foundation
Before attempting double unders, you need to be completely comfortable with single unders. That means 50+ unbroken reps, no hitches in your rhythm, and consistent timing. Your single under technique should involve:
- Light jumps with minimal knee bend
- A quiet landing on the balls of your feet
- Arms down by your sides with wrists doing the work
If you’re relying on big arm circles or kicking your heels back, clean that up before moving forward.
2. Choose the Right Rope
Not all ropes are created equal. As a beginner, you want a speed rope with a cable that offers some feedback — not too light and not too thick. Adjustable-length ropes are ideal, and the right rope length will typically have the handles reaching your armpits when you stand on the middle.
Avoid heavy beaded ropes or ropes that are too short. The right rope gives you consistency, and consistency builds muscle memory.
3. Practice the Power Jump
Double unders require a higher, more controlled jump — but not a higher effort jump. You should be able to jump 2–3 inches off the ground without tucking your knees or flailing your arms.
Practice this “power jump” without the rope at first. Imagine you’re bouncing on a pogo stick — spring straight up and land softly, maintaining balance and posture. Do sets of 10–20 jumps to build muscle control and rebound strength.
4. Drill Rope Whip Timing Without Jumping
Timing is everything in double unders, and much of that timing comes from the wrist flick. To get the feel for it, hold the rope handles and practice spinning the rope with fast wrist action while standing still. You want to hear a quick “whip-whip” sound — this mimics the speed needed to get the rope around twice.
You can also try penguin claps: Jump in place without a rope and slap your thighs twice while in the air. If you can consistently clap twice before landing, you’re on the right track for rope speed and jump height.
5. Start With Single-Single-Double Drills
Once you’re confident in your jumping and wrist control, it’s time to try your first actual double under — but with some breathing room. The best way to approach this is with the single-single-double drill:
- Do two regular single unders
- Then go for one double under
- Then reset and repeat
This pattern helps your brain get used to the rhythm and gives you a little preparation before each double. Over time, reduce the number of singles between each double.
6. Eliminate Bad Habits Early
As you begin to land some double unders, it’s easy to fall into bad movement patterns that might feel like shortcuts but are actually progress killers. Common issues to avoid include:
- Donkey kicks – kicking your feet back instead of jumping straight up
- Wide arms – keeping hands too far from your body, shortening the rope arc
- Tucking knees – jumping inefficiently or leaning forward in the air
Fixing these early will save you from a painful relearning process later.
7. Work Toward Consistent Singles-Doubles Rhythm
At this stage, your goal is consistency. Begin stringing together a single-double-single-double pattern. This not only reinforces good timing, but helps your body get used to rebounding and staying composed under the rope.
It’s better to land five consistent reps in this pattern than to constantly miss when attempting ten straight doubles. Control and rhythm will get you to longer sets faster than brute effort.
8. Transition to Unbroken Double Unders
Once you’re comfortable with the alternating rhythm, start reducing the singles until you’re doing straight, unbroken double unders. The goal now is short, clean sets:
- Start with a goal of 2–3 unbroken
- Then build to 5, then 10, then 15
Stay relaxed, keep your eyes forward, and focus on breathing. Your body has already learned what to do — now you’re refining endurance and mental control.
9. Build Volume Gradually
Now that you can hit double unders consistently, start adding volume with intention. Don’t just “go until you fail.” Instead, work in controlled sets:
- 3 sets of 10
- 5 sets of 15
- 3 sets of 25
This helps reduce fatigue-based errors and builds both coordination and cardiovascular capacity. If you’re training for CrossFit WODs or competitions like HYROX, being able to hit 30–50+ reps unbroken is crucial — but it doesn’t happen overnight. Keep building.
10. Test Yourself Under Pressure
Once you’ve mastered the skill in isolation, it’s time to apply it under fatigue — because in real workouts, your heart rate will be up, your grip might be tired, and your focus will be challenged.
Try incorporating double unders into short circuits:
- 30 seconds of air squats, then 20 double unders
- 10 push-ups, 10 sit-ups, 20 double unders
- 3 rounds for time of 50 single unders + 20 double unders
The goal is to simulate workout conditions while keeping your form intact. This is where true mastery is forged.
BONUS Double Under Techniques
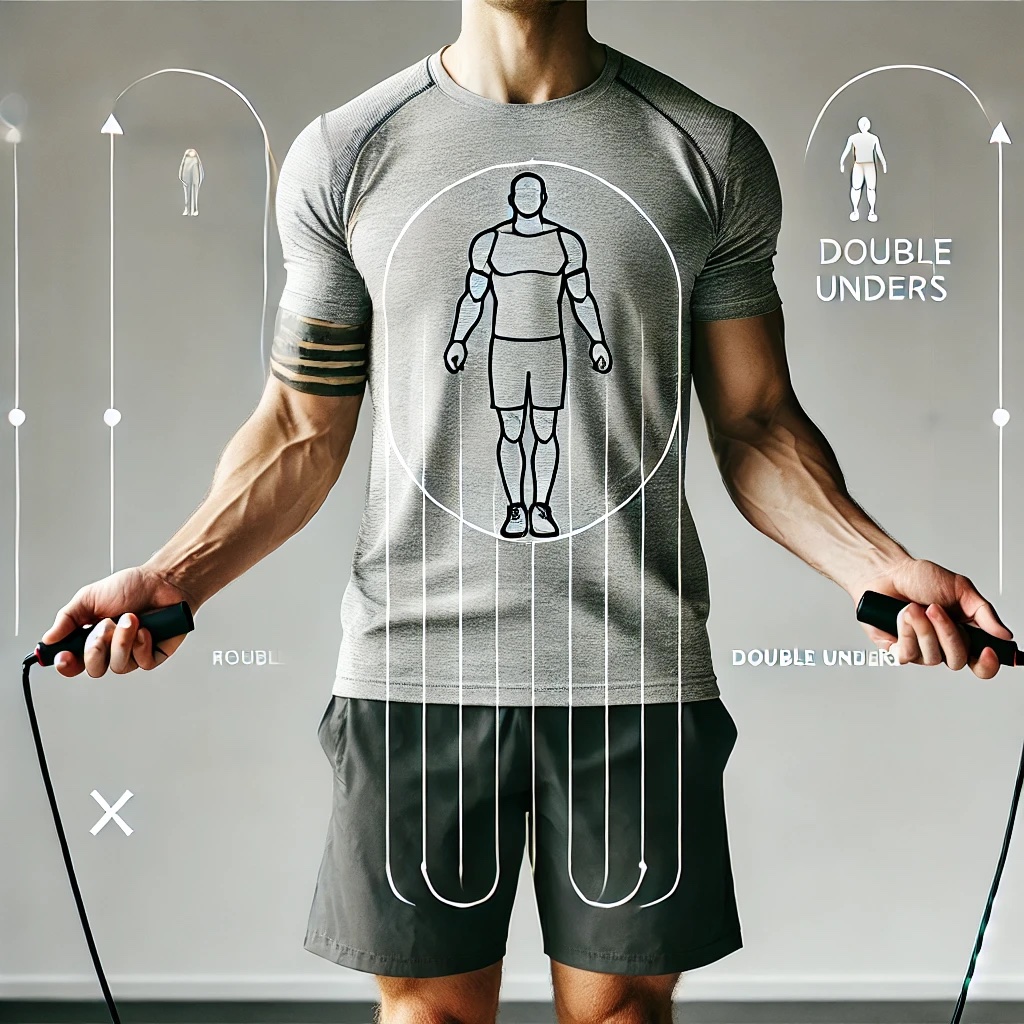
👐 Where Should Your Hands Be During Double Unders?
Hands should be positioned:
- Just in front of your hips
- About 4–6 inches away from your body
- At or slightly below your waistline
- Elbows tucked in close to your ribs
Think of your hands as the axis of the rope’s rotation. Keeping them in the right place ensures that the rope spins efficiently and stays under your feet without catching or bouncing off the floor.
✅ Why This Matters
- If your hands are too far forward, the rope shortens and hits your toes.
- If your hands are too wide, the rope shortens and hits your shins.
- If your hands are too high, the rope arc flattens, making it harder to clear your feet.
💡 Coaching Tip: Visualize a “Rope Tunnel”
Imagine you’re jumping inside a tunnel made by the rope. If your hands shift forward, upward, or outward, that tunnel collapses. Keeping your hands close to your hips maintains the ideal circular path and keeps the rope moving smoothly beneath you.
🛠️ Drill to Fix Hand Position
Wall Rope Drill:
- Stand facing a wall, about 6 inches away.
- Hold your rope handles properly.
- Practice single and double under jumps while ensuring your hands don’t drift forward and hit the wall.
This forces you to keep your hands back by your hips and develop proper wrist-driven rotation.
Final Thoughts: Mastery Takes Patience
Learning double unders doesn’t happen in one workout. Like any skill, it takes practice, repetition, and a step-by-step approach. Most beginners fail not because they can’t jump high enough, but because they skip the foundational steps and try to muscle through it.
Stick to the progression. Celebrate small wins — your first clean double, your first unbroken 5-rep set, your first WOD with no rope trip-ups. Every rep counts.
And remember, double unders aren’t just about fitness. They’re a mental game — a lesson in timing, patience, and perseverance. Stay consistent, train smart, and you’ll get there.


